Marsupials and Monotremes Fabric Blog Tour

I am very excited to be the first blogger on the blog tour for  Amanda Brandl’s latest collection with Kennard and Kennard, Marsupials and Monotremes.  This is the second time I’m working with Amanda’s sweet fabric designs, previously I was lucky enough to work with her Bush Gum Blossom collection.

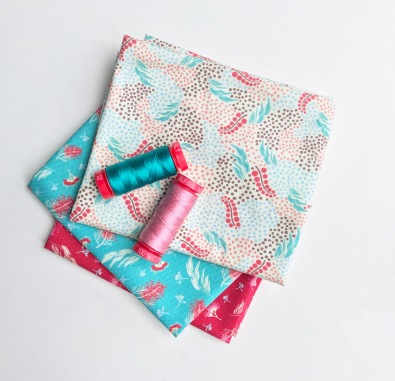
I chose a few of the floral prints to use for my blog tour projects, I loved how they featured Australian native trees in beautiful non traditional colour ways.

img_1050

For my first project I made a scallop trivet using the pattern from Sedef Imer’s latest book Zakka Home.  I paired Amanda’s gorgeous Grevillea on Aqua design and Gum Leaf Shake in Pink and Aqua with a dark cream spotted fabric and hand quilted the trivet using Aurifil thread in 12 weight, with a little ribbon detail for the centre.

img_1313

My second project I really wanted the bold scarlet print of the Grevillea on Red to be celebrated so I paired it with a linen and then added hand quilting using Aurifil Thread in complimentary red, blue and cream tones.

img_2193


I didn’t use a pattern for my pot holder but simply cut out two rectangles ( 4 1/2 x 8 inches) in the linen and Grevillea on Red print then stitched the long edges together. I hand quilted a piece of insulated batting (8 x 8 inches) to the wrong side of the pot holder and then cut another piece of Amanda’s print in 8 x 8 inches for the back.  I used a plate to draw round the corners and cut the excess fabric away to give me curved edges.  I then made a quilt sandwich by putting right sides of fabric together and stitched them together using a 1/4 inch seam (leaving a gap to turn the pot holder out).  I then hand stitched the gap closed and added a ribbon and wooden button.  A really simple gift idea and perfect way to showcase the work of a talented young Australian designer!

Processed with MOLDIV

Marsupials and Monotremes is a celebration of Australian animals and flora using Amanda’s signature aesthetic of combining beautiful colours and sweet illustrations.

I love that Amanda manages to capture the Australian landscape in a way that can be used for so many projects, from patchwork to clothes to whole quilts, and you will get to see great examples of these and many more during the Blog Tour over the next few weeks.

Tomorrow Kylie from Wombat and Poss is on and I can’t wait to see how Amanda’s designs have inspired her.  To see the entire schedule of the tour pop over to Amanda’s blog page.  You can also find out full details of stockists for the Marsupials and Monotremes collection on Amanda’s webpage and on the Kennard and Kennard webpage.

Happy Sewing!

Ange


Mon Beau Jardin Blog Tour

Welcome to my stop on the blog tour celebrating the latest collection from Nadra, the very talented designer, quilter, teacher from the blog Ellis & Higgs.

Mon Beau Jardin Blog Tour Image

The Mon Beau Jardin collection is Nadra’s fourth with Penny Rose Fabrics and my first opportunity to work with one of her collections. Nadra use of colour with her beautiful floral designs has been a huge inspiration to me in the past and even more so with her latest collection.  You can see all the sweet details of each and every print on Nadra’s blog here.

Processed with MOLDIV

The collection was inspired by Nadra’s new found love of gardening and I adore the way Nadra has combined candy colour hues with pretty floral prints and classic stripes.

I choose to create with the pink prints from the collection and wanted to showcase the pretty designs (especially those sweet butterflies) as much as possible.   I used hexagon papers from Tales of Cloth and created a supersized hexie flower cushion.  (Nadra’s designs are the perfect size for fussy cutting 1 inch hexies!)

This project was insipired by youngest daughter learning to read and needing a special little reading spot just for her.

Processed with MOLDIV

Processed with MOLDIV


The sweet butterflies, candy coloured hues paired perfectly with a red dotted cot sheet which I wanted to incorporate – a little reminder of when we used to read to her when she was a baby.  I then hand quilted the cushion using Aurifil thread in 12 weight.


Processed with MOLDIV


With the leftover fabric I couldn’t help but make one of See Kate Sew’s pencil pouch with a bow. It’s a free pattern on her blog and is as fun to make as it looks.  It was the perfect way to use the last pieces of prints because not only is my youngest learning to read she’s also learning to write!

Processed with MOLDIV

I feel very honoured to help celebrate Nadra’s collection Mon Beau Jardin and can’t wait to see how it inspires Jennie next at week on her blog Clover and Violet.  It’s also definitely worth having at the previous bloggers projects.  They include Amber from the Gigi’s Thimble Blog sweet baby quilt and Jemima from the Tied with A Ribbon blog’s adorable unicorn cushion and bag.  All super sweet but super different ways of using the collection!

Happy sewing

Ange


A Little Patchwork Table Tutorial

Most nights I stitch whilst sitting on the couch and most nights I end up dropping a needle, losing a paper piece section or having neck pain from hunching over.  However thanks to my husband and his creativity I now have a little patchwork table – a perfectly compact and portable sewing table which thanks to an adjustable board also means no more hunching over.

Processed with MOLDIV

I posted a photo on Instagram of the table he built and received lots of requests for a tutorial so here goes.

Materials and Tools Needed

For the little patchwork table, you’ll need some basic tools and materials, but it can vary depending on how you decide to make it. We kept it simple by using a couple of pre-made homeware items from ikea.  You can  make the table without using Ikea items, it might just take a little longer to make.

Materials:

40 x 12mm, ~1500mm x Pine strip (This gets cut up to 2x200mm, 2x530mm, so any similar sized scraps of wood lying around will work, particularly for the longer pieces which are used to stabilise the bed tray)

75 x 35mm, 200mm Pine 

2x bolts, 7mm x 70mm

2x Wing nuts, 7mm

4x Steel washer, 7mm

2x Spring washers, 7mm

4 x 60mm screws

From Ikea:

APTITLIG Chopping board, bamboo (approx $4.99 AUD) – This is the ‘top board’

DJURA Bed tray, rubberwood (approx $14.99 AUD) – this is the ‘base’

DRAGAN 4-piece bathroom set, bamboo (approx $14.99 AUD) – these are the little wooden boxes attached on the base which I store my thread, paper pieces etc in

Tools used:

  • Carpenter’s square (for a 45 degree cut)
  • Sandpaper
  • Wood saw
  • Drill Bits
  • Drill
  • Pencil for marking
  • wood glue (PVA or similar)
  • clamps or vice

Putting it all together:

Strengthening the bed tray:

The base of the Ikea bed tray is pretty light, so use 2x ~530mm pine strip and glue* them underneath to provide some additional strength and stability. For a neat fit, cut the edges at ~ 15-20 degree angle so they fit into the edges underneath the tray nicely. Prior to gluing, line up one of these strips with the where the base of the adjustable arm will be fixed.

image8 copy

Adjustable arm:

Cut the 40 x 12mm pine strips into two pieces, each 200mm long.

Sand the edges and corners smooth.

The length of the strips  can be varied according to how high you want the top board to be. Note that if you make the strips too long and the base too short, it will cause stability problems with the top board.

adjustarm

Cut the 75 x 35mm pine on a 45 degree angle starting at 100mm.

Sand the edges and corners smooth.

Due to the angle cut you’ll end up with one larger piece (this will become the ‘top’ piece of pine and attach to the top board) and one smaller piece (this will be the ‘bottom’ piece of pine and attach to the base). The 45 degree angle cut simply allows the pieces to sit together when the top deck is in the lowest position.

adjustable arm


Clamp the two 200mm strips to the two pieces of two larger pieces of pine (one strip either side about half way up the sides). You can adjust these a bit and see how the arm will raise and lower.


Drill two holes, one at each end, through all pieces of wood. Fit the bolts washers and wing nuts. Use a spring washer one each bolt. This assists with tensioning of the adjustable arms. 

Drill 2x small pilot holes for the bed tray and bottom piece of pine half way along the edge of the tray and close to the front edge. One of these holes should go through a pine strip previously placed underneath the bed tray.

Glue and screw the bottom piece of pine, half way along the edge of the tray and touching the front edge. Make sure you check that the pieces are the right way up!

Mark a centre line on the top deck and balance the top board onto the adjustable arm and move  to an appropriate position (generally the edge will be close to directly above the front edge of the base). 

Drill 2x small pilot holes nearer to the back and centre of the top board and top piece of pine (make sure the screws won’t be too close to the bottom piece of pine). You can use a larger drill bit to make sure the screws are counter sunk into the top deck. Glue and screw the top deck to the longer piece. 

Glue two of the smaller the storage boxes in an appropriate position. The smaller two fit perfectly at the front.

Processed with MOLDIV


When not in use you can fold down the base legs and the adjustable top board so it will store easily away while still keeping the wooden boxes secure.

If you end up making a little patchwork table and post a picture on Instagram make sure you use the hashtag #alittlepatchworktable so I can see your version.

Happy building and sewing!

Ange

La Conner Blog Tour

I am so excited to launch the blog tour for Jera from Quilting in the Rain latest collection with Lecien Fabric, La Conner.  The 36 print collection was inspired by Jera’s visits to La Conner, Washington, a pretty little town known for its flowers and strawberry farms.

fabric shot


I adore any opportunity to work with both Jera and Lecien as not only do they create super pretty collections together, they have both been so very supportive of me – including giving me the opportunity to make a La Conner mini quilt for Fall Market!

For the La Conner blog tour I made a strip quilt from a fat quarter bundle.  The pretty country colours and sweet flecks of gold inspired me to make a super soft vintage looking quilt, the kind that is used every day by my girls as they snuggle on the couch.

Processed with MOLDIV


To create a similar quilt, cut strips from your La Conner fabric bundle of varying lengths and all 4.5 inches wide. Take two pieces and sew them  wrong side together along the 4.5 inch width and using a 1/4 seam allowance.  Continue adding pieces until you have a strip that is at least 48 inches long and 4.5 inch wide.  Continue making 48 inch length strips until you have the length of the quilt you want (I made 16 x 48 inch length strips).


Sew your strips together by laying two strips wrong side together and using a 1/4 seam allowance sew along the 48 inch length.  Continue adding strips until you have sewn all the pieces together.  Straighten the edges of your quilt so it is 45 inches wide and the length you wanted (mine ended up being 60 inches)  Quilt as desired (I quilted using a straight lines using 50 wt Aurifil thread in 2410 along the length of the quilt) add your backing and then bind (I used the red colour way from Lecien Basic Color collection for my binding).  If you are unsure how to bind, Jera has lots of brilliant free tutorials on her blog all about binding.

Processed with MOLDIV

Thank you so much for stopping by on the blog tour.  For the next 6 weeks every Monday and Thursday a new project is going to be featured showcasing the versatility of the La Conner collection.  Drop by Jera’s blog to find out more and be inspired by all her beautiful photos and tutorials.

la conner blog tour soical media-05

Happy Stitching!

Ange

bike


Fat Quarter Shop Lady of the Lake Quilt Along

Today is the launch of the Fat Quarter Shop Lady of Lake Quilt Along!  The pattern is a part of the Classic and Vintage quilt series.

This quilt pattern is ideal if you want a quick finish featuring classic blocks, as each block finishes at 12 1/2 inches.  And if like me you tend to makes smaller quilts you’ll be happy to know the pattern even comes in Lap size (as well as all the way up to a King size).

blocks

For my first block I have used a combination of Tasha Noel Pixie Noel prints and Kona solids from my stash.  Fat Quarter shop are giving the opportunity to try before you buy as you can download the block pattern for free from their website here.  Then if you want, for only a few dollars more you can purchase the downloadable quilt pattern directly from the Fat Quarter shop.

finishedblock

If you haven’t participated in a quilt along before I highly recommend it!  You essentially follow a schedule of when to complete your blocks and you can choose to post your pictures on social media so the Fat Quarter Shop and other participants can see all your wonderful work (the Instagram hashtags are #ladyofthelakequilt and #fqsquiltalong.

I find quilt alongs help me stay motivated to finish a project and whether you follow along via Instagram or Facebook you’ll love seeing how different all the blocks can look depending on the fabric that is used.

If you want even more information and/or see exactly how the block is pieced together pop over to the Fat Quarter Shop You Tube Channel!

Happy stitching!


Strawberry Biscuit Blog Hop

When Elea Lutz contacted me and asked if I wanted to join the Strawberry Biscuit blog hop I was so excited (and fairly nervous).  This collection was a firm favourite the moment I saw it on her Instagram feed.  IMG_9353

I knew that with such pretty and cheery fabric I wanted to make
something for my daughters. I then thought about why I adored this collection so much. It wasn’t just the fact it features sweet baking kitties, singing blue birds, tiny flowers and a divine cheater print perfect for making 1 inch hexies.

IMG_9396

It was Elea’s perfect eye for details and colours. Her beautiful illustrations are reminiscent of my favourite vintage prints and I find each and every piece of the collection sweet and inspiring. Suddenly the answer came to me – for this arts and craft obsessed family I would make a children’s travelling art case!

A ‘go anywhere’ art case would be a great way to display the sweet prints, as well help encourage my daughters to keep creating, no matter where they are (who knows, maybe one day they will be fabric designers!).

Open art case


I couldn’t find an art case pattern so instead I came up with a simple design that I then embellished with fabric stamps, hexies and a fussy cut quilt block. I even took the cheater print and turned it slightly so that the squares became diamonds! Such a simple twist and the result is so sweet


Below I have a little step by step tutorial on how I made the case. You can make the case as simple or as intricate as you like.  I have a place for pencils, a pouch for treasures and a section for an art pad.  I encourage you to make the case your own by adding the little touches you love creating and as a result it is sure to be a cherished piece that encourages the next generation of creators.

IMG_9398
There have been so many amazing bloggers featured in this blog hop and tomorrow is no exception.  Make sure you have a look at the projects by Megan from Dolly Henry and Stacy from Farm Road Quilts you are guaranteed to be inspired by what they have made with Strawberry
Biscuit!

Art Case


Travelling Art Case Tutorial

Fabric requirements

Inner Cover
Cover – 12 1/2 inches by 21 1/2 inchesIMG_9355


Pencil Section

Outer Fabric – 7 1/2 inch by 5 1/4 inch
Lining – 7 1/2 inch by 5 1/4 inch

Pouch with Flap
Outer Fabric – 7 1/2 inch by 3 1/2 inch
Lining – 7 1/2 inch by 3 1/2 inch

Flap 7 1/2 inch by 3 1/4 inch
Flap Lining 7 1/2 inch by 3 1/4 inch

Notebook Section
Outer Fabric – 9 1/4 inch 9 1/4 inch
Lining – 9 1/4 inch 9 1/4 inch

Outer Cover
Cover – 12 1/2 inches by 21 1/2 inches
Batting (I used a stiff bag batting) – 12 inches by 21 inches
Handles – 2 x (2 inch by 8 inch)

Instructions

Please note these are the basics for preparing the case. Remember to personalise it!

Inner Cover

  1.  Sew each of the section and pouch pieces to its corresponding lining by placing the two pieces right side together. Sew around each piece using a 1/4 seam and leaving a 1 inch gap to allow you to turn the pieces out. Turn them out and then press.
  2.  Lay out your inner cover right side facing up. On the upper left side of the cover lay your pouch section and then the flap piece slightly above the pouch section. Below the pouch, position the pencil section (Hint: remember the pencils will stick out the top so you need to make sure there is enough space between the bottom of the pouch and the top of the pencil section).
  3. Place the notebook section on the right side of the cover making sure you place it low enough that your notebook won’t stick out of the top of the case.
  4. Check that you are happy with the layout of each of your sections, and that they are far enough away from the outer edge that they won’t be caught up in the hem when you sew the outer and inside cover together.
  5. You will now sew each section in place to the inner cover. For all pieces (except the pouch flap) top stitch along the two short sides and along the bottom. You will then top stitch just along the top of the pouch flap.
  6. You are now going to make the slots for the pencils to go into. We are using quite IMG_9098thick pencils so I measured 1 inch intervals along the length of pencil section. (Hint: if you are using thinner pencils you might be able to fit in extra pencils). I then top stitched a straight line down each inch interval (from the top to the bottom).
  7. Depending on what you are putting in your pouch with a flap you can either add snaps or just leave it as is.

Outer Cover

  1. Quilt the Outer cover to the batting however way you wish. if you want to keep it really simple you could just sew 1/4 inch around the edge of the batting so that it is secure to the front cover.
  2. Take the two strips of fabric for the handles. Take the fabric and fold in in half length ways so it measures 1 inch by 8 and then press. Open up the strip and then fold each 8 edge so that they meet at the centre fold. Now fold the entire thing at the original fold so you end up with a 1 inch by 8 inch strip with concealed edges. Repeat for the other strip. Then top stitch 1/8 inch in down the length of of each strip along both sides.
  3. Now we are going to attach the handles to the outside cover. Measure 3 inches down and attach the handle shorter (1 inch) edge to the cover. Measure 7 1/12 inches down from the top and attach the other shorter edge. You should now have a handle! (Hint: make sure the handle is laying against the cover so that it is out of the way when you sew the front and back cover together). Repeat on the other side for the other handle.

Final Construction

  1. You are now going to sew the outer cover to the inside cover. Lay the two cover right side together and pin. Sew around using a 1/4 inch seam and leaving a 4 inch gap at the bottom to turn the case out.
  2. Turn out the case and press, making sure you push out each corner.
  3. Hand sew or machine stitch the opening closed
  4. Fill up your case with lots of fun bits and pieces! And in our case remove all those art pieces and replace them with your tiny vintage dolls and their pet dinosaur. Enjoy!IMG_9343

A Patchwork Kite – a quick tutorial

IMG_8227
My patchwork kite using Lecien Old New 30s collection cheater fabric with a cute hexie flower

I recently found myself with some time to spare and was after a quick project. After searching Pinterest for inspiration I come across a cloth kite. It looked cute but I thought I would make a patchwork version, it was so popular on Instagram  I’ve pulled together a quick tutorial if you would like to try it yourself.

Step 1. Cut 16 x 3 inch squares (I used a a combination of florals, linens and solids.

Step 2. Sew 2 row of 2 squares, 3 rows of 4 squares.

Step 3. Sew the 5 rows all together, in the following order – 2 row block, 4 row block, 4 row block, 4 row block and finally 2 row block.

IMG_8129

Laying out my fabric blocks

Step 4. Draw a line running diagonal down through each of the top 3 inch blocks and down through the 1st and 4th block of the second row. This provided me with the top of diamond kite shape.

Step 5. Position your ruler to the top left the 3rd row and angle down to the middle of the bottom row. Draw a straight line and repeat on the other side at the top right hand corner of the last block.

Step 6. You should now have a complete diamond shape drawn on your fabric, use these lines to cut out the diamond shape.

Step 7. Add a stiff batting to your diamond fabric piece and quilt as desired.

Step 8. Position your backing piece of fabric underneath your diamond quilt top and cut around leaving a 1/4 inc seam.

Step 9. Cut a piece of string and pin it to the batting at the bottom of the kite, this will be your kite string.

Step 10. Right sides together, sew your backing to your quilted kite – making sure your string hasn’t slipped out. As you sew, leave a gap on one of the sides to enable you to turn the kite out.

Step 11. Using the gap you left at step 10, turn out the kite and hand stitch the opening closed.

Step 12. Embellish the string with pretty ribbons or bias and then enjoy your super cute patchwork kite wall hanging!

IMG_8190 (a)

The finished patchwork kite – a perfect wall hanging for a child’s room