Rainy Day Sewing Book Tour

Welcome to my stop on the Rainy Day Sewing Book Tour!  The sweet Rainy Day Sewing book is the latest publication for Amy Sinibaldi and Kristyne Czepuryk with Tuva Publishing.

Processed with MOLDIV

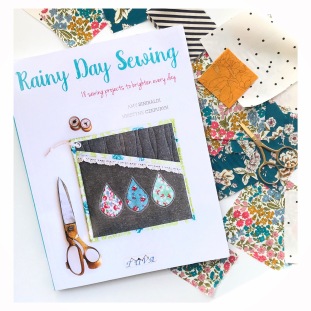
The books features 18 sewing projects from quilts to totes to toys to pencil cases to potholders.  It really is the perfect combination of projects, so you are sure to find a project to sew, stitch and create no matter your amount of experience or spare time!

IMG-9966

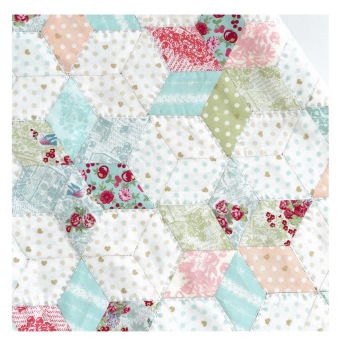
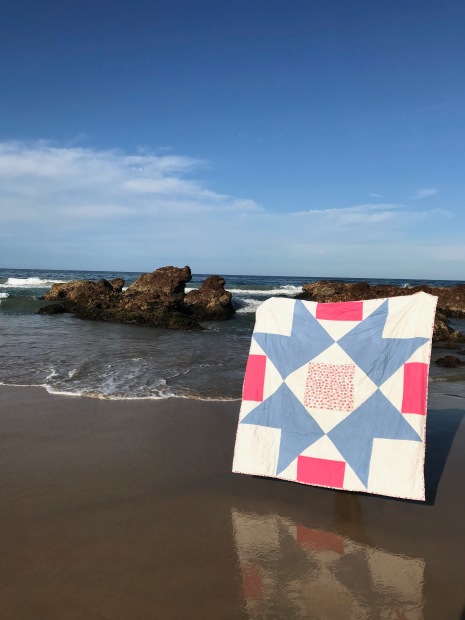
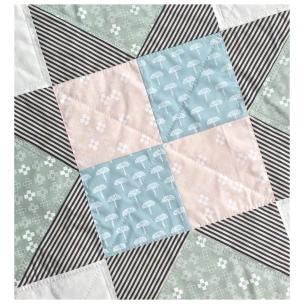
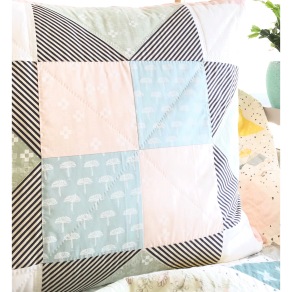
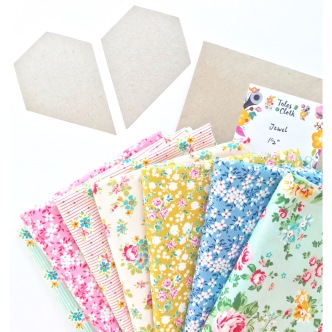
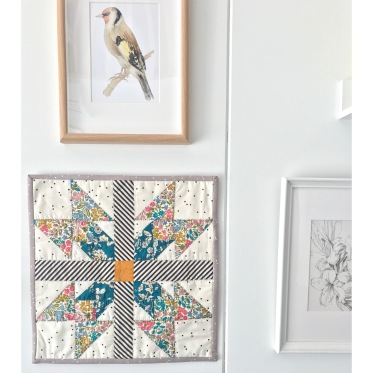
The first project I made was the Doll Quilt, which I actually made as a mini quilt.  I used a combination of low volumes from my stash and paired it with some of the recently released Liberty Fabric prints from the AW19 collection from Ava and Neve.

Processed with MOLDIV

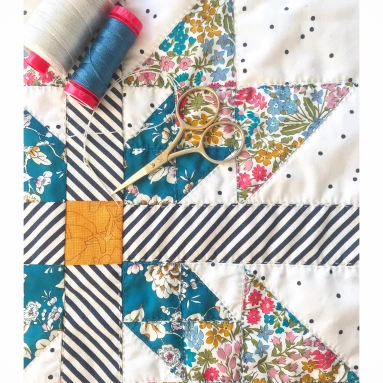
To make it extra special I hand quilted the block using Aurifil 12 weight thread in 1125 and 6724 and bound it using Blossom fabric in Gray. Its the first mini quilt I have made for our lounge and I’m looking forward to making a few more over the coming months.

Processed with MOLDIV

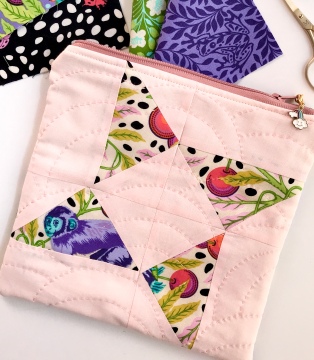
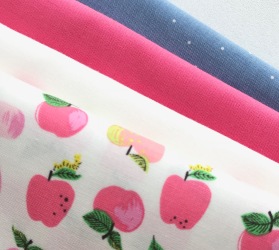
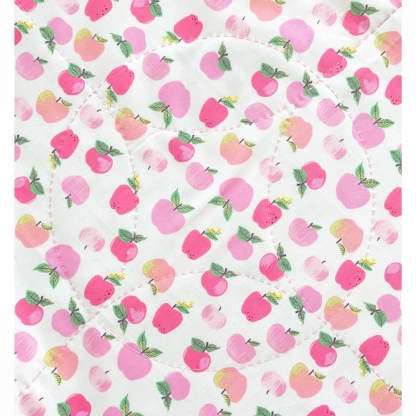
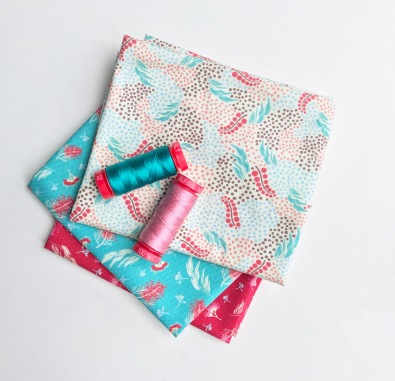
The second project I made from Amy and Kristyne’s book was the Olivia Pencil Case.  Its a really sweet  case that only uses Fat 1/8th pieces of fabric so it was a perfect way to inexpensively showcase one of my favourite Liberty Betsy prints. I’m looking forward to making a few more pouches for Christmas gifts as they are super quick to make and are the perfect size to fit into both a school bag or a handbag.

Processed with MOLDIV

Thank you for stopping by my stop on the Rainy Day Sewing book tour, yesterday Faith showcased the sweet Chloe the Cat pattern and doll bedding set.  It is definitely worth stopping by Faith’s blog to see all the details!  The book tour continues on the 9th on Kristina’s blog Centre Street Quilts with the below makers to follow after.

Print

Happy sewing

Ange


Banded Glasses Pouch Tutorial

A wrote up a tutorial for a cute glasses pouch about a year ago but never got around to posting it!  I love sewing projects that are pretty and practical so I hope you like it as much as I do.  For my pouches I have used Liberty Prints (Betsy 19b and Strawberry Thief 19a)  and Aurifil floss.

IMG_4516

This pattern is a perfect use of Ava and Neve’s Fat 1/8 pieces (in fact one Fat 1/8 can be used for the covers of three banded glasses pouch) and would make a lovely quick gift.

IMG_4513

Requirements

4 x 18 inch piece of fabric for the outer case (if you are using a fat 1/8 with a directional print you will need to cut two pieces of 4 x 9 1/14 inch and stitch them together along the shorter edge to make one 4 x 18 piece)

4 x 18 inch piece of fabric for the case lining

Floss or 12 inch weighted thread in matching colour to the case lining

4 x 4 ½ inch piece for the band

4 x 18 inch of fusible interfacing (or you could use batting but would need to either quilt or spray baste it to the wrong side of the case outer)


Instructions

  1. Fuse your batting or interfacing to the outer case fabric (Fig 1.)
  2. Use a bowl or similar to draw a curve on one of the 4 inch ends of both the outer case and lining strips of fabric (Fig 2.)
  3. Using scissors or a rotary cutter cut around the curved line you have drawn
  4. Take your piece of fabric for the band and fold it in half along the 4 inch length, finger press then unfold (Fig 3.).  Using the crease line fold your raw edges along the 4 inch sides together and then fold in half again.  The raw edges along the 4 1/2 inch side will now be concealed, stitch along both edges of the 4 ½ inch side  using a ¼ inch seam (Fig 4.).
  5. Take your strip for the band (now measuring 2 inches by 4 ½ inches) and position it 1 ½ inches from the bottom of the straight 4 inch edge of your external fabric (right side facing up).  Using a 1/8 inch seam stitch to the edges of the external fabric (making sure to position the edges to align as the band is ½ inch longer however you need the room to slip the flap into on the finished case (Fig 5.). 
  6. Lay the outer case and case lining pieces right sides together and using a ¼ seam stitch together.  Leave a 1 inch opening along the longer side to turn out the case (Fig 6.).
  7. Using your scissors snip around the curved edges making sure you don’t cut through your stitching. This will reduce the bulk in you seam and assist with the curved edge sitting flatter
  8. Using the 1 inch gap turn out your case completely and press.
  9. Stitch the gap closed using a whip stitch
  10. Fold the straight end up 6 ½ inches and clip in place (Fig 7.).
  11. Using your floss or 12 weighted thread in matching colour to your case lining whip stitch the edges in place.  Being careful to stitch only through the internal cover (Fig 8.).
  12. Press case again
  13. Add any buttons or embellishment you like.

Perfect 5 Quilt Along

Welcome to my stop on the Perfect 5 Quilt Along!

I am very lucky to be one of the bloggers showcasing the new Sew Emma Perfect 5 Quilts Book and Creative Grids Perfect 5 Ruler.

Fat Quarter Shop launched the Perfect 5 Quilts book in early September and it is filled with block and quilt ideas for charm packs, all inspired by the sweetest cookies ever baked.

All 16 quilts are made using 5 inch squares of fabric, which you can make using  pre-cut charm packs or use the Creative Grids Perfect 5 Ruler to make you own using your favourite fabrics!

As part of the quilt along I had the opportunity to make two blocks from the book, the Pizzelle block and the Pinwheel Cookie block.

Processed with MOLDIV

Pizzelle Block from The Perfect 5 Quilts

The Fat Quarter Shop also sent me the latest Tula Pink collection Monkey Wrench from Free Spirit to use.  Its definitely different to my usual colour palette but I must admit I loved working with the saturated colours and fussy cutting those cute monkeys and ladybirds was so much fun (and easy because of the distinct lines on the ruler)!

IMG-2048

Pizzelle Block from the Perfect 5 Quilts Book

Normally I use a 12 inch square ruler to cut out my fabric but the Creative Grids Perfect 5 ruler made such a difference to making my blocks.  In particular it features little grippers that grip on to your fabric when you push down to cut out the fabric.  The extra grip ensures precise measurements and prevents costly slippage, and Im speaking from experience – I can’t tell you the amount of times I’ve accidentally sliced a hole in my fabric when my ruler has slipped.

Now I couldn’t just add my cute blocks to my unfinished object pile, so instead I used my versions of the Pinwheel Cookie and Pizzelle blocks to make sewing machine accessory pouches using the free tutorial from the Fat Quarter Shop.

IMG-2168

Using the blocks I made for the zipper pouches is a great way to not only showcase the sweet blocks but also a fantastic opportunity to experiment with quilting designs.

IMG-2114

In fact I had so much fun making the blocks that I actually made two more pouches – this time using the Anagram collection from Ruby Star.

3F9DF303-2EBE-4CD7-B54A-A8CECCAF0ECC

Hopefully I’ve inspired you to make your own Pinwheel Cookie and Pizzelle blocks and if you head over to the Fat Quarter Shop Jolly Jabber Quilting blog you can see all the other sweet cookie inspired blocks that feature in this Quilt Along.

And if you are looking for gift ideas for yourself or a quilty friend check out the Fat Quarter Shop Perfect 5 Quilts book combo pack!

Happy Sewing!

Ange


Loyal Heights Project Tour

Today is my stop on the Loyal Heights Project Tour.  Loyal Heights is the gorgeous collection by  Jera Brandwig from the Quilting in the Rain blog.  Jera, is a quilter, author, fabric designer and a mum of two so I am very excited and inspired to work with her.

This is Jera’s fourth collection with Lecien and I always appreciate the opportunity to create with her delicate designs.  The collection features Jera’s sweet floral, fauna and cottage illustrations in a range of soft colours with gold accents!  The designs are perfect for so many projects, you can see the full collection here

For my projects I chose to make two pouches but both have a very different look to them.

For my first project I used a pattern from the Zakka Handmades book by Amy Morinaka. I used the stunning blues and reds from the collection to make a bright little pouch -perfect for a little girl to store all her favourite treasures in.

30086F15-BF83-4BF0-8A42-BCD818C25461

For my second project I used the softer colours in 1 1/2 inch 6 sided diamond shapes (from Tales of Cloth) to make a super sized zipper pouch.  I hand stitched the diamonds together (trying to fussy cut as many cute designs as possible).

Processed with MOLDIV

I then hand quilted the blocks to quilt batting and added a zipper.  The super size of the pouch makes it perfect for storing larger projects or even a book or laptop bag.

Processed with MOLDIV

I didn’t use a pattern but if you are new to sewing zipper pouches Jera has a brilliant tutorial on her blog here.

Processed with MOLDIV

Thanks for taking to time to stop by my blog, next on the stop is Faith from the Sarana Avenue blog and I can’t wait to see how Jera’s collection has inspired her.

And if you want to be inspired by more makers here is the full list of blogs participating

project tour lineup-05

Happy sewing

Ange

Fat Quarter Shop Precut Parade

Today is my stop on the latest Fat Quarter Shop quilt along, Precut Parade, celebrating their updated webpage that lists all their exclusive free quilt patterns! To make it easier they’ve now separated the free patterns by manufacturer and precuts.

Over the next two months a different blogger is going to make a quilt using one of the free precut patterns and then give away the precuts they used via Instagram.

IMG_5008

I was lucky enough to be selected to make a project using a fat quarter bundle.  I chose Alison Glass’ Road Trip collection with Andover.  A beautiful collection featuring prints that Alison designed to represent a combination of imagination, memories, and themes.

Processed with MOLDIV

I decided the Fat Quarter Shop Cobblestone Shortcut Quilt would be the perfect pattern to showcase the bold colours and larger designs.   The quilt would be perfect for a beginner because there are no seams that need to be nested or aligned (although I would recommend using a rotary cutter and mat to get even rectangles).

Processed with MOLDIV

If you make a pattern using one of the precut patterns and are on Instagram make sure you use the tags #fqsquiltalong and #precutparade so the Fat Quarter shop can see your quilt!

Happy sewing

Ange


Quilt Big Blog Tour

Welcome to my stop on the Quilt Big Blog Tour! Quilt Big is the latest book written by Jemima Flendt of Tied With A Ribbon  and published by The Quilting Company.  This is Jemima’s second book and is all about making bigger sized blocks for faster quilt finishes.  With over 20 different projects and beginner friendly instructions and guidance this book is perfect gift for quilters or those wanting to start quilting.

Processed with MOLDIV

Jemima shows you how to use single block patterns to create big and bold quilts.  The upsized scale of the blocks are also a perfect way to showcase your favourite prints without having to sacrifice any of their details.

I chose the Home Treasure quilt to make for the tour as well as to use my favourite print from Heather Ross’ Kinder collection.  The print features rosy apples which I paired with some solids!

img_3334

I made the quilt in an afternoon and spent the next few weeks hand quilting it using Aurifil thread in 12wt.

Processed with MOLDIV

I backed the quilt with a Heather Ross lawn print and because of its soft light feel has been used every night this summer.

img_9161

As the projects come together so quickly I also made the Indian Star block from Jemima’s book. I used the latest Blueberry Park prints from Karen Lewis and the stripes from Amy Sinibaldi’s Les Petits fabric collection.

Processed with MOLDIV

The block is a 24 inch square so its perfect for a mini quilt (as suggested in Jemima’s book however I made it into a supersized cushion, perfect for leaning up against in a cozy sunny spot or relaxing on the floor with a great book.

Processed with MOLDIV

Make sure you pop over to Jemima’s blog to see a few sneak peaks of projects from her book.  Meanwhile tomorrow Nadra from Ellis and Higgs is showcasing her super sweet project on the Quilt Big Blog Tour and then the tour keeps going for the next 3 weeks!

28th Jan          Jemima Flendt at www.blog.tiedwitharibbon.com

29th Jan          Melissa LeRay at  www.ohhowsweet.com

31st Jan           Nadra Ridgeway at www.ellisandhiggs.com

1st Feb            Alyce Blyth at  www.blossomheartquilts.com

4th Feb            Lauren Wright at  www.mollyandmama.com.au

5th Feb            Aurifil Thread at  auribuzz.wordpress.com

6th Feb            Amanda Castor at  www.materialgirlquilts.wordpress.com

7th Feb            Samantha Dorn at www.aquapaisleystudio.com/blog

8th Feb            Sharon Burgess at www.lilabellelanecreations.com

11th Feb          Peta Peace at www.shequiltsalot.com

12th Feb          Elea Lutz at   www.elealutzdesign.com

13th Feb          Shannon Fraser at www.shannonfraserdesigns.ca

14th Feb          Saija Kiiskinen at www.saijaelina.blogspot.com

15th Feb          Sedef Imer at  www.downgrapevinelane.com

18th Feb          Kate Basti at www.quiltwithkate.com

19th Feb          Minki Kim at  minkikim.com

20th Feb          Ayda Algin at www.cafenohut.com

21st Feb          Elizabeth Chappell  at www.quilterscandybox.com

quilt big blog tour

Happy Sewing

Ange

Marsupials and Monotremes Fabric Blog Tour

I am very excited to be the first blogger on the blog tour for  Amanda Brandl’s latest collection with Kennard and Kennard, Marsupials and Monotremes.  This is the second time I’m working with Amanda’s sweet fabric designs, previously I was lucky enough to work with her Bush Gum Blossom collection.

I chose a few of the floral prints to use for my blog tour projects, I loved how they featured Australian native trees in beautiful non traditional colour ways.

img_1050

For my first project I made a scallop trivet using the pattern from Sedef Imer’s latest book Zakka Home.  I paired Amanda’s gorgeous Grevillea on Aqua design and Gum Leaf Shake in Pink and Aqua with a dark cream spotted fabric and hand quilted the trivet using Aurifil thread in 12 weight, with a little ribbon detail for the centre.

img_1313

My second project I really wanted the bold scarlet print of the Grevillea on Red to be celebrated so I paired it with a linen and then added hand quilting using Aurifil Thread in complimentary red, blue and cream tones.

img_2193


I didn’t use a pattern for my pot holder but simply cut out two rectangles ( 4 1/2 x 8 inches) in the linen and Grevillea on Red print then stitched the long edges together. I hand quilted a piece of insulated batting (8 x 8 inches) to the wrong side of the pot holder and then cut another piece of Amanda’s print in 8 x 8 inches for the back.  I used a plate to draw round the corners and cut the excess fabric away to give me curved edges.  I then made a quilt sandwich by putting right sides of fabric together and stitched them together using a 1/4 inch seam (leaving a gap to turn the pot holder out).  I then hand stitched the gap closed and added a ribbon and wooden button.  A really simple gift idea and perfect way to showcase the work of a talented young Australian designer!

Processed with MOLDIV

Marsupials and Monotremes is a celebration of Australian animals and flora using Amanda’s signature aesthetic of combining beautiful colours and sweet illustrations.

I love that Amanda manages to capture the Australian landscape in a way that can be used for so many projects, from patchwork to clothes to whole quilts, and you will get to see great examples of these and many more during the Blog Tour over the next few weeks.

Tomorrow Kylie from Wombat and Poss is on and I can’t wait to see how Amanda’s designs have inspired her.  To see the entire schedule of the tour pop over to Amanda’s blog page.  You can also find out full details of stockists for the Marsupials and Monotremes collection on Amanda’s webpage and on the Kennard and Kennard webpage.

Happy Sewing!

Ange


A Little Red in The Woods Fabric Collection

Getting the opportunity to create with Jill Howarth’s latest collection with Riley Blake was such a wonderful honour and it was hard to choose which prints to create with.  The Little Red In The Woods collection is a combination of larger illustrations celebrating Little Red Riding Hood and tiny smaller prints featuring tiny florals, bows and fruit.  What’s not to love!  Jill Howarth is a wonderful illustrator and surface designer creating nostalgic designs of sweet characters and  has worked on numerous beautiful books and Riley Blake fabric collections.


While not a Christmas collection the mint, white and red colours are perfect for any handmade Christmas gifts you plan on making!

IMG_9903

I used the free tutorial from Lindsay from Primrose Cottage Quilts Instagram page to make 4.5 inch tiny present blocks.  By adding another strip of fabric to the block I was able to make a perfectly sized heat/cold pack.  Once you’ve decided on your size you just need cut a same sized backing piece of fabric and with right sides together stitch around the edges using a ¼ inch seam and leaving a 1 ½ inch gap.  The gap will then enable you to turn the rectangle out and you can then fill it using either dry rice or wheat.  If you do use rice you will need to add a cup with water in the microwave so the rice does not dry out.

IMG_0721

The next project I made was a mini quilt using drunkards path blocks.  I hadn’t made this type of block before but I wanted to showcase the larger beautiful scenes and twirling curved blocks seemed the perfect accompaniment (You can follow a free tutorial on the Love Patchwork and Quilting website) I then hand quilted the blocks using 12 weight aurifil thread and then used a Riley Blake Basic print, 1/8 inch striped print in Sweet Mint, for my binding.

IMG_0648

My final project was a cushion for my youngest daughter’s bed.  I choose to use the Mandolin English Paper piecing pattern from Tales of Cloth.  The block features lots of opportunities to showcase the Little Red in the Woods illustrations.

IMG_0755

I fussy cut my pieces using the acrylic templates and then hand quilted the pieces together.  I also hand appliqued the block to the Riley Blake striped print and used Aurifil 12 weight thread in 1148 to keep with the pretty aqua tone of the prints.

IMG_0788

I was so excited to create with Jill’s collection and am looking forward to making a few more Christmas gifts with these sweet collection!

Happy Sewing

Ange

A Stitch In Time Blog Tour

A Stitch in Time is Sharon Burgess’ latest book with Tuva Publishing.  Sharon from Lilabelle Lane Creation has written a book that is a wonderful celebration of needle craft featuring 18 different projects, and it is perfect for those who have never stitched to those like me who stitch most nights.  The first 33 pages has all the hints and techniques you’ll need for hand quilting, embroidery and adding those personal touches to your projects to make them truly unique!  Sharon has included lots of detailed instructions and pictures for each of the steps.

Processed with MOLDIV

I also love that Sharon has used Tilda Fabric throughout her book, and the collections she’s used are still readily available (so no need to spend hours hunting for out of print collections or wondering what fabric she used).

The first project I made was the vintage pouch.

Processed with MOLDIV

A sweet spin on a simple pouch design and would be a great first project for someone new to sewing.

IMG_0525

Making 1 inch hexes from Tilda Fabric in Bird Pond and Devonstone solids  I embellished my pouch not with a vintage doily like Sharon did but instead following her steps at the front of the book stitched lazy daisies using 12wt aurifil thread.  It was the first time I had tried creating lazy daisies but Sharon’s instructions guide you through every step and are all accompanied by clear illustrations.

Processed with MOLDIV

The next project I made was the All My Love baby doll quilt.  A lovely paper piecing project that would be a perfect gift for any child who loves their doll or softie.  I accidentally ordered the wrong size paper pieces from Tales of Cloth (1 ½ inch not 1 inch jewel pieces) but followed Sharon’s piecing instructions to ensure my points would all align.  This time I used a combination of linen and Tilda Apple Butter.

Processed with MOLDIV

Apple Butter is released next month and I love the playful 1940s style of  colours and prints.  And while I was making the doll quilt I decided it was too sweet not to be hung up in my house and instead turned it into a mini quilt for my lounge room.

Processed with MOLDIV

If you have a friend interested in learning to stitch or if you want to sew up a few new projects that are a perfect combination of pretty and useful then I highly recommend A Stitch In Time!

You can also see more versions of projects from the books made by a great range of inspiring bloggers by following the hashtags #astitchintimeepp and #stitchintime or #tuvapublishing!  Always a brilliant way to see how different fabrics can change the look of different projects!

Unknown-4

Happy Sewing

Zakka Home Book Tour

Zakka Home Book Tour Banner Square - v2

Welcome to my stop on the Zakka Home Book tour.  Zakka Home is the latest book written by the very talented Sedef Imer from Down Grapevine Lane and is her second publication with Tuva Publishing.

Sedef’s book is a beautiful collection of small and large projects,  and perfectly showcases her wonderful aesthetic of sweet and modern.

Processed with MOLDIV

I used her House Lavender Sachets pattern to make my first project. However instead of sachets I used her lovely design to make mini house bunting for my girls bedroom.  (There has been an update to this pattern which you can find here )

Processed with MOLDIV

I made it using a selection of fabrics from my collection and stitched the houses to a piece of cotton ribbon – you could also take this bunting idea and theme it for Christmas or any occasion.  And their tiny size means they are perfect for using up your favourite scraps.

Processed with MOLDIV

The second project I made was Sedef’s sweet pouches. They are a fantastic size for gift bags or even storing little trinkets (I’ve been using mine as busy bags to keep in my handbag and keep my children entertained when we are out and about).

I made the bags using Jill Howarth’s latest collection with Riley Blake, Little Red in the Woods.  The collection is available this month or you can pre-order through your local fabric store (its also available at Fat Quarter Shop.)

Processed with MOLDIV

Jill’s collection is perfect for fussy cutting and the pouches are the perfect size to showcase the cute illustrations.

Processed with MOLDIV

The Zakka Home Book tour has been so much fun to be a part of and I’ve adored seeing how the same patterns can look different depending on the creator and their selection of fabrics and accessories.  Below is the full list of participants, definitely worth popping in having a look at their posts.

Tomorrow Sarah will be wrapping the Tour and I can’t wait to see what she creates!

22 October – Sedef Imer – Down Grapevine Lane – @downgrapevinelane
23 October – Jemima Flendt – Tied With A Ribbon – @tiedwitharibbon
24 October – Minki Kim – Minki’s Work Table – @zeriano
25 October – Jane Davidson – Quilt Jane – @quiltjane
26 October – Elizabeth Chappell – Quilters Candy Box – @quilterscandybox
27 October – Lauren Wright – Molly and Mama – @mollyandmama
28 October – Sarah Scott – Piccolo Studio – @piccolostudio_sarah
29 October – Alyce Blyth – Blossom Heart Quilts – @blossomheartquilts
30 October – Emily Dennis – Quilty Love – @emily_dennis_
31 October – Sharon Burgess – Lilabelle Lane Creations – @lilabellelane
1 November – Wynn Tan – Zakka Art – @zakkaArt
2 November – Amanda Woodruff – A Crafty Fox – @a.crafty.fox
4 November – Samantha Dorn – Aqua Paisley Studio – @aqua_paisley
5 November – Love Patchwork & Quilting – @lovequiltingmag
6 November – Kate May – The Homemakery – @thehomemakery
7 November – Ayda Algin – Cafe Nohut – @cafenohut
8 November  – Faith Essenburg – Sarana Ave – @faithessenburg
9 November – Nadra Ridgeway – Ellis & Higgs – @ellisandhiggs
10 November – Fat Quarter Shop – @fatquartershop
11 November – Laura Cunningham – @laura_zuckerkuss
12 November – Bev McCullough – Flamingo Toes – @flamingotoes
13 November – Amy Smart – Diary of a Quilter – @diaryofaquilter
14 November – Riley Blake Designs – @rileyblakedesigns
15 November – Michelle Hickson – @coleandtaffy
16 November – Christopher Thompson – The Tattooed Quilter – @the_tattooed_quilter
17 November – Ange Hamilton – A Little Patchwork – @alittlepatchwork
18 November – Sarah Ashford – Sarah Ashford Studio – @sarahashfordstudio
19 November –  Sedef Imer – Down Grapevine Lane – @downgrapevinelane
Happy Sewing
Ange