
Welcome! Today is my turn on the Posy Garden blog hop.
Posy Garden is Carina Gardner’s latest collection for Riley Blake and is a perfect combination of soft tiny florals and bold colours. Along with the pretty prints and colours what I really love about Carina’s collection is how versatile the designs are! One week in and the blog hop has featured a wide range of makes from baby quilts, a fantastic tote and a gorgeous tunic for a little girl.
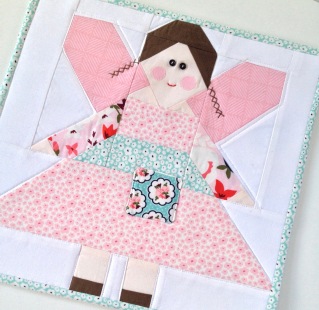 The Posy Garden prints are so pretty so I decided to use it for a project I had long promised my youngest daughter – a tooth fairy pillow… well actually a tooth fairy wall hanging. My eldest has a pillow but with months between tooth fairy visits it can be quite hard to find her tiny pillow just before bedtime. So instead of a pillow I made a tooth fairy wall hanging. That way when not tucked under her pillow waiting for a visit she can have it hanging on her wall above her bed. And when you use the super cute tooth fairy quilt block pattern from Elea Lutz’s book Pretty Playtime sewn with Carina’s beautiful collection who wouldn’t to have it displayed as art!

The little fairy’s dress pocket on Elea’s quilt block is the perfect size for the envelopes our fairy leaves behind. (Side note: if your fairy is interested in leaving an envelope like the one our fairy leaves let her know she can download the free printable from Handmade Charlotte’s blog)

I turned the block into a mini quilt by making a quilt sandwich (quilt block, batting and then backing fabric) and just prior to binding I added two triangle sections at the back top corners to make two little pockets I could slip in a piece of dowel when I needed to hang it on the wall.
To hang it to the wall and because every fairy really needs a special place I used the free star pattern from Mollie’s blog Wild Olive (I printed the template at 40 percent). I changed her tutorial slightly by added a little batting between the back and front fabrics. Then just prior to sewing the back and front together I added a loop of thread to the top point of the star and a piece of thread coming out of the two bottom points. Then with the two threads hanging at the bottom of the star I tied them to each end of the dowel with a simple knot. Ta da, a super simple and pretty way to hang a mini quilt.

Now when the tooth fairy visits we can easily remove the tooth fairy wall hanging and place it under her pillow, and the next morning we can pop it back on to the wall.
And as I said at the start of this blog the collection is so versatile it works for all sorts of projects for all sorts of ages. When I saw how perfectly the print looked with some soft faux leather I just had to give the You and Mie free tutorial for a foldover clutch a go. And the result is sweet posy perfection!
To continue to be inspired by this gorgeous collection make sure you visit Amy from Ameroonie Designs blog tomorrow and for a full list of bloggers participating in the hop have a look at Carina’s beautiful website.
Happy creating

This is a brilliant idea and I love that tiny special note in Fairy’s pocket. The print you chose for the clutch is simply perfect. Lovely makes Ange! xo
LikeLike
Thank you so much Larisa!
LikeLike
What a cute wall hanging and I’m sure your little one was elated! I love the foldover clutch also, very fresh and classy!
LikeLike
Thanks Kathleen! I really love both little projects and I can’t wait to make more foldover pouches!
LikeLike
This is so gorgeous Ange! I love the sweet fairy and how she hangs up with the star!
LikeLike
Aww thank you so much Megan!!
LikeLike
This is gorgeous Ange! I love the clutch, and the sweet fairy!
LikeLike